
Introduction
Greek cuisine is a true reflection of the country’s rich cultural heritage, blending fresh ingredients, bold flavors, and centuries-old cooking traditions. Known for its vibrant use of olive oil, fresh vegetables, and aromatic herbs, Greek food is both delicious and nourishing. From the famous souvlaki and moussaka to the refreshing Greek salad and creamy tzatziki, Greek recipes have captured the hearts and taste buds of people around the world.
In recent years, Greek food has become increasingly popular worldwide, with more and more people seeking out these Mediterranean flavors for both health benefits and culinary enjoyment. Whether you’re exploring Greek cuisine for the first time or looking to recreate your favorite dishes at home, you don’t need to be an expert to enjoy the authentic taste of Greece.
In this blog post, we’ll be sharing 10 delicious Greek recipes that are easy to make at home. From traditional dishes to quick and healthy meals, you’ll find something for every occasion—whether it’s a casual weeknight dinner or a festive celebration with family and friends. Let’s dive into the world of Greek cuisine and bring a taste of the Mediterranean into your kitchen!
This introduction sets the stage for the rest of the blog post, introducing Greek cuisine while highlighting its growing global appeal. It also clearly states the goal of the post, offering readers the promise of easy, delicious recipes to try at home.

1) The Best Traditional Greek Dishes You Can Try
Moussaka: A Comforting, Layered Dish Made with Eggplant, Ground Meat, and Béchamel Sauce
Moussaka is one of the most iconic dishes in Greek cuisine, known for its comforting and hearty layers of flavor. This dish combines three key elements: tender eggplant, savory ground meat, and a creamy béchamel sauce. It’s the perfect meal for a cozy evening, a family gathering, or a special occasion.
The Layering Technique
Moussaka is built layer by layer, with each one offering a different texture and flavor. The first layer consists of thinly sliced and lightly fried eggplant. Eggplant is a staple in Mediterranean cooking, and in moussaka, it serves as the perfect base for the rich flavors that follow. The eggplant slices soften as they cook, absorbing the savory juices of the meat sauce, making every bite melt in your mouth.
Ground Meat Filling
The second layer is a flavorful ground meat filling, typically made with beef or lamb, though variations may use pork or chicken. The meat is sautéed with onions, garlic, and a combination of herbs and spices like cinnamon, nutmeg, and allspice. These warm spices give moussaka its unique, aromatic flavor that sets it apart from other baked dishes. The addition of tomato paste or red wine can enhance the richness of the meat, creating a savory sauce that complements the eggplant beautifully.
Béchamel Sauce
The final layer of moussaka is a rich and velvety béchamel sauce, made with butter, flour, and milk. This creamy white sauce is the crowning glory of moussaka, adding both texture and depth to the dish. It’s seasoned with a pinch of nutmeg and sometimes a sprinkle of cheese, which gives it a golden, slightly crispy top when baked. The béchamel acts as a binder, uniting the eggplant and meat layers while adding an indulgent creaminess to each bite.
Baking to Perfection
Once the layers are assembled in a baking dish, moussaka is baked in the oven until the top is golden and bubbling. The slow baking process allows all the flavors to meld together, resulting in a dish that is both savory and satisfying. After baking, it’s best to let the moussaka cool slightly before serving, as this helps the layers set, making it easier to slice and serve.
Moussaka is often enjoyed as a main course, paired with a simple Greek salad and some crusty bread. It also makes for great leftovers, as the flavors continue to develop over time. Whether you’re making it for the first time or are already a moussaka enthusiast, this classic Greek dish is sure to impress and delight your guests.
Souvlaki: Grilled Skewers of Meat, Often Served with Pita, Tzatziki Sauce, and Vegetables
Souvlaki is one of Greece’s most beloved street foods and a quintessential part of Greek cuisine. This dish consists of small, tender pieces of marinated meat skewered and grilled to perfection, creating a savory and smoky flavor that’s irresistible. Whether served on its own, in a pita wrap, or alongside fresh vegetables, souvlaki is a delicious and versatile meal that’s perfect for any occasion.
The Meat and Marinade
Traditionally, souvlaki is made with lamb, pork, or chicken, although beef is also sometimes used. The meat is cut into bite-sized cubes and marinated to infuse it with deep flavors. Marinade typically includes olive oil, lemon juice, garlic, oregano, and a touch of salt and pepper, with some variations adding ingredients like vinegar, red wine, or cumin. The acidity from the lemon juice and vinegar helps tenderize the meat, while the herbs and spices impart that signature Mediterranean flavor.
Grilling to Perfection
Once the meat has marinated, it’s threaded onto skewers and grilled over an open flame or on a grill. The grilling process creates a perfect char on the outside, while keeping the inside juicy and flavorful. As the skewers cook, the aroma of grilled meat and herbs fills the air, making souvlaki a dish that’s both delicious to eat and delightful to smell. Grilling is a traditional method that adds a smoky depth to the meat, giving it an irresistible taste.
Serving Souvlaki
Souvlaki can be served in a variety of ways, making it a versatile and easy meal for both casual gatherings and formal dinners. One of the most popular ways to enjoy souvlaki is in a pita wrap. The warm, soft pita serves as the perfect vessel for the grilled meat, along with toppings like fresh tomatoes, onions, and lettuce. A generous dollop of tzatziki sauce, made from Greek yogurt, cucumber, garlic, and dill, adds a refreshing and creamy contrast to the smoky meat.
Alternatively, souvlaki can be served on a platter with a side of grilled vegetables, such as peppers, onions, and tomatoes, and a portion of rice or a Greek salad. The dish is often accompanied by more tzatziki sauce for dipping, enhancing the flavors with every bite.
Why Souvlaki is So Loved
Souvlaki is loved for its simplicity and versatility. It’s quick to prepare, making it an ideal dish for busy weeknights or weekend cookouts. It’s also a crowd-pleaser at parties and family gatherings, as it can easily be served to large groups of people. The combination of juicy, flavorful meat with the refreshing tang of tzatziki and the warm, pillowy pita creates a perfect balance of textures and tastes.
Whether you enjoy it as a light lunch or as part of a larger Greek feast, souvlaki offers the essence of Greek cooking: fresh ingredients, bold flavors, and a delightful experience. With its emphasis on grilling and seasoning, it also embodies the Mediterranean diet, making it a healthy yet indulgent choice for any meal.
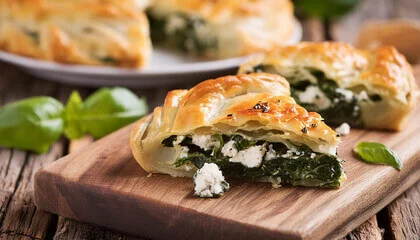
Spanakopita: A Savory Spinach Pie Made with Filo Pastry and Feta Cheese
Spanakopita is a beloved Greek dish that combines the earthy richness of spinach with the creamy tang of feta cheese, all wrapped in flaky, golden layers of filo pastry. Often enjoyed as a snack, appetizer, or light meal, this savory pie is a perfect example of Greek cuisine’s ability to transform simple ingredients into something extraordinary. The layers of delicate filo pastry create a crunchy exterior, while the spinach and feta filling offers a harmonious balance of flavors, making it a favorite in both Greek homes and restaurants worldwide.
The Filling: Spinach and Feta Cheese
At the heart of spanakopita is its filling, which consists of spinach, feta cheese, onions, and herbs. Fresh spinach is typically sautéed until wilted, releasing its natural moisture and creating the perfect texture for the pie. In some variations, frozen spinach is used as it is more convenient and provides a similar flavor when properly thawed and drained.
Feta cheese, the star of Greek dairy products, adds a salty, tangy richness to the filling. The cheese blends with the spinach to create a creamy, flavorful mixture that is seasoned with herbs like dill, parsley, and sometimes nutmeg or lemon zest. The combination of these ingredients brings a depth of flavor to the dish, while keeping it light and refreshing.
In some recipes, onions or leeks are sautéed with the spinach to enhance the flavor, while eggs are added to bind the filling together and give it a custard-like consistency. The result is a creamy, herby mixture that’s the perfect complement to the crisp filo pastry.
Filo Pastry: Crisp and Golden Layers
The filo (or phyllo) pastry is the key to spanakopita’s signature texture. Made from paper-thin sheets of dough, filo creates a delicate, crunchy crust when baked. To prepare spanakopita, multiple layers of filo are brushed with olive oil or melted butter, creating a rich, golden color and an irresistible crispiness once baked.
As the pie bakes, the filo pastry layers puff up and become crisp, enveloping the spinach and feta filling in a flaky, airy crust. The contrast between the crisp pastry and the soft, creamy filling is what makes spanakopita so satisfying to eat. The buttery filo crust is light but sturdy, ensuring that every bite offers both texture and flavor.
Baking and Serving Spanakopita
Spanakopita can be made in several forms, with the most common being a large pie or individual triangular pastries. In the large pie version, the filo dough is layered in a baking dish, filled with the spinach mixture, and then topped with more filo layers to create a golden, flaky top. The pie is then baked in the oven until the filo is perfectly crisp and the filling is set.
Alternatively, individual servings can be made by folding the filo dough around the filling to create small, triangular pastries. These mini spanakopitas are perfect for parties, picnics, or as a quick snack. They are equally delicious served hot or at room temperature, making them versatile for any occasion.
Spanakopita is traditionally served as part of a meze platter, alongside other Greek dishes like tzatziki, olives, hummus, and grilled meats. It also pairs beautifully with a crisp Greek salad and a glass of chilled white wine.
Why Spanakopita is So Popular
What makes spanakopita so appealing is its combination of textures and flavors. The delicate filo pastry provides a satisfying crunch, while the creamy spinach and feta filling delivers a rich, comforting taste that’s both savory and light. It’s a dish that strikes the perfect balance between indulgence and freshness, making it suitable for any time of the day.
Spanakopita is also a dish that reflects the simplicity and brilliance of Greek cooking. It uses a few basic ingredients, but the careful layering and preparation turn them into a masterpiece. Whether enjoyed at a festive celebration, as a quick lunch, or as a light dinner, spanakopita never fails to impress with its deliciousness.

2) Healthy Greek Recipes for a Mediterranean Feast
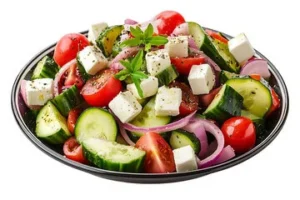
Greek Salad: A Refreshing Salad with Tomatoes, Cucumbers, Olives, Feta Cheese, and Olive Oil
Greek salad, also known as Horiatiki (meaning « village salad »), is a quintessential dish in Greek cuisine. It’s simple, fresh, and packed with vibrant flavors, making it the perfect side dish or light meal during the warm months. Unlike many Western-style salads, Greek salad is typically served without lettuce, allowing the flavors of the fresh vegetables, olives, and cheese to shine. With its combination of juicy tomatoes, crisp cucumbers, briny olives, and creamy feta cheese, all drizzled with high-quality olive oil, Greek salad is a celebration of Mediterranean ingredients at their best.
Fresh, Seasonal Ingredients
The foundation of a Greek salad is its fresh, seasonal produce. Ripe, juicy tomatoes are the star of the dish, contributing a burst of sweetness and acidity that perfectly balances the other flavors. In Greece, tomatoes are often picked at the height of summer, making them extra flavorful and sweet. Paired with crunchy, cool cucumbers, which add a refreshing element to the salad, the vegetables provide a satisfying contrast in texture.
Red onions are typically included in Greek salad as well, thinly sliced to add a mild, slightly sweet sharpness. While not always included in every version, they bring another layer of flavor to the mix and help cut through the richness of the feta cheese and olives.
Olives and Feta: The Heart of the Salad
Olives are a key ingredient in Greek salad, and they are usually Kalamata olives—known for their rich, bold flavor and slightly bitter taste. The olives add a salty, briny bite that complements the sweetness of the tomatoes and the creaminess of the feta. They are typically left whole or halved to provide bursts of flavor in each bite.
Feta cheese, another hallmark of Greek cuisine, is often served in large blocks rather than crumbled or shredded. The salty, tangy cheese pairs perfectly with the vegetables, adding creaminess and depth to the salad. Greek feta is traditionally made from sheep’s or goat’s milk, which imparts a distinctive taste and texture that is hard to replicate with cow’s milk feta.
A Dressing of Olive Oil and Herbs
What makes Greek salad truly special is its simple dressing, which highlights the quality of the ingredients. Extra virgin olive oil, which is the cornerstone of Greek cooking, is drizzled generously over the salad. This not only adds richness but also acts as a base to marry the flavors together. The olive oil is often complemented with a splash of red wine vinegar or lemon juice to add brightness and acidity.
Fresh oregano is typically sprinkled on top of the salad, adding a fragrant, earthy flavor that ties all the ingredients together. Some variations may include a pinch of salt and pepper, although the olives and feta usually provide enough saltiness on their own.
Serving Greek Salad
Greek salad is typically served chilled or at room temperature, making it a perfect dish for warm weather. It can be enjoyed as a refreshing side dish to complement grilled meats, seafood, or a Mediterranean platter. It’s often served as part of a meze spread (a variety of small plates), along with other dishes like tzatziki, hummus, or spanakopita.
In Greece, Greek salad is often eaten alongside fresh, crusty bread, which is used to soak up the olive oil and juices from the salad. The bread acts as a perfect accompaniment, providing a satisfying texture and enhancing the overall experience.
Why Greek Salad is So Loved
Greek salad’s popularity comes from its combination of simplicity and bold flavors. It’s quick to prepare, making it a go-to dish for busy weeknights or summer barbecues. The salad is also versatile, easily adjusted to suit personal preferences or dietary needs. It’s naturally gluten-free, vegetarian, and packed with nutrients, making it a healthy and satisfying choice.
Additionally, Greek salad perfectly embodies the essence of the Mediterranean diet: fresh, wholesome ingredients that are both delicious and good for you. The balance of vibrant vegetables, briny olives, creamy feta, and rich olive oil makes every bite a celebration of the flavors of Greece.
Grilled Fish with Lemon and Herbs: A Simple Yet Flavorful Way to Prepare Fish with Mediterranean Flavors
Grilled fish with lemon and herbs is a quintessential Mediterranean dish that celebrates the natural flavors of fresh fish, complemented by the brightness of lemon and the aromatic essence of Mediterranean herbs. This dish is a perfect example of Greek cuisine’s focus on simplicity—bringing together high-quality ingredients and cooking techniques that allow each component to shine. Whether you’re grilling whole fish or fillets, the combination of fresh seafood, zesty lemon, and fragrant herbs creates a light yet satisfying meal that embodies the Mediterranean lifestyle.
The Fish: Fresh, High-Quality Seafood
The key to making grilled fish with lemon and herbs truly exceptional is starting with the freshest seafood available. In Greece, a variety of fish is used for grilling, including popular choices like sea bass (lavraki), bream (tsipoura), and sardines (sardeles). These fish are prized for their delicate flavors and firm, flaky flesh, which hold up well to grilling.
When selecting fish for this dish, opt for whole fish if possible, as grilling them whole allows the natural juices to stay intact, keeping the fish moist and flavorful. For fillets, choose thick, firm fish like salmon, swordfish, or halibut. Regardless of the type of fish, it’s important to look for fish that is fresh, with clear eyes, firm flesh, and a clean, ocean-fresh smell.
The Marinade: Lemon, Olive Oil, and Fresh Herbs
A marinade for grilled fish is simple but incredibly flavorful, made with a few core ingredients that highlight the Mediterranean’s emphasis on fresh, aromatic components. The star of the marinade is, of course, lemon juice, which imparts a refreshing acidity that brightens up the fish. In Greek cuisine, lemon is often used to add a tangy zing to both savory dishes and salads, and here, it works beautifully to enhance the delicate flavor of the fish.
Extra virgin olive oil is the base of the marinade, contributing richness and a subtle fruitiness that balances the tartness of the lemon. Olive oil is a fundamental ingredient in Greek cooking, and its high quality plays a major role in bringing the dish together.
Fresh herbs are a key element, and Mediterranean favorites like oregano, thyme, and rosemary are commonly used to infuse the fish with fragrant, earthy notes. A handful of chopped parsley or dill can also be added for an extra burst of freshness. Garlic is another popular addition to the marinade, adding depth and savory complexity. The herbs and garlic complement the natural taste of the fish, creating a harmonious blend of flavors that elevates the entire dish.
Grilling the Fish: Technique and Timing
Grilling the fish over an open flame or on a grill pan is what gives this dish its signature smoky flavor. Before placing the fish on the grill, make sure it’s been well-marinated for at least 30 minutes, allowing the flavors to permeate the flesh. If grilling a whole fish, it’s essential to score the skin with a few diagonal slashes to ensure even cooking and to help the marinade penetrate the flesh.
Once the grill is preheated to medium-high heat, place the fish on the grates. Grilling time will vary depending on the size and type of fish, but a general rule of thumb is about 4-5 minutes per side for whole fish, or 3-4 minutes per side for thicker fillets. The fish is ready when the flesh is opaque and flakes easily with a fork. It’s important not to overcook the fish, as it can become dry and lose its delicate flavor.
Serving Grilled Fish with Lemon and Herbs
Grilled fish with lemon and herbs is often served as the centerpiece of a meal, accompanied by a variety of sides. Common pairings include roasted or grilled vegetables like bell peppers, zucchini, and tomatoes, as well as Greek-style potatoes, either roasted with herbs or fried to crispy perfection.
A side of Greek salad, made with tomatoes, cucumbers, olives, and feta cheese, is a refreshing accompaniment that complements the grilled fish beautifully. Additionally, crusty bread is often served to soak up the flavorful juices from the fish and the marinade.
The dish is typically garnished with extra lemon wedges, fresh herbs, and a drizzle of olive oil for added richness and flavor. For a complete Mediterranean experience, serve the fish with a glass of crisp white wine, such as a light Assyrtiko or a chilled glass of Retsina.
Why Grilled Fish with Lemon and Herbs is So Popular
Grilled fish with lemon and herbs is popular for several reasons. First, it’s a healthy and light dish that perfectly captures the essence of Mediterranean cuisine, which is known for its emphasis on fresh, wholesome ingredients. The use of lemon, olive oil, and herbs enhances the natural flavors of the fish without overpowering them, making it a simple yet satisfying dish.
The ease of preparation is another key factor in the dish’s popularity. With minimal ingredients and quick grilling time, it’s perfect for a weeknight dinner or a casual summer barbecue. It’s also incredibly versatile, as you can use a variety of fish depending on what’s available, making it a go-to recipe for seafood lovers.
Finally, grilled fish with lemon and herbs is a dish that evokes the relaxed, sun-drenched atmosphere of the Mediterranean coast. It’s a dish that brings people together around the table to enjoy good food, good company, and the pleasures of simple, flavorful cooking.
Tzatziki Sauce: A Creamy Yogurt-Based Sauce Made with Cucumber, Garlic, and Herbs, Perfect for Dipping
Tzatziki is a classic Greek sauce that has become an iconic accompaniment in Mediterranean cuisine. This creamy, refreshing sauce is made from thick Greek yogurt, cucumber, garlic, and a blend of fresh herbs, offering a delightful balance of tanginess, creaminess, and aromatic flavors. Whether served as a dip, a condiment, or a side, tzatziki is incredibly versatile and pairs perfectly with many dishes, from grilled meats to vegetables, and even as a topping for flatbreads and pita.
The Base: Greek Yogurt
At the heart of tzatziki is Greek yogurt, which lends the sauce its rich, creamy texture. Greek yogurt is a staple in Mediterranean cooking and is known for its thick, velvety consistency and tart flavor. Unlike regular yogurt, Greek yogurt is strained multiple times to remove excess whey, resulting in a product that is much denser and creamier. This gives tzatziki its signature smooth texture and helps it hold up well as a dip or topping.
The slight tang of the Greek yogurt forms the perfect base for tzatziki, complementing the refreshing cucumber and providing a cool contrast to the garlicky, herbal notes that follow. The richness of the yogurt also helps balance the acidity of the cucumbers and lemon juice, creating a harmonious blend of flavors.
Cucumber: The Cool and Crisp Element
Cucumber is the star of the tzatziki sauce in terms of texture and freshness. The cucumber is usually grated or finely chopped, then mixed into the yogurt base. Its cool, crisp nature adds a refreshing crunch and lightness to the sauce, making it perfect for pairing with warm, grilled foods or savory dishes.
The cucumber also has a mild, watery flavor that complements the tangy yogurt without overpowering it. In traditional tzatziki recipes, the cucumber is often salted and left to drain before being added to the yogurt. This step helps remove excess moisture from the cucumber, ensuring that the tzatziki remains thick and creamy without becoming watery.
Garlic and Herbs: Bold and Aromatic Flavors
Tzatziki wouldn’t be tzatziki without the addition of garlic, which infuses the sauce with a bold, savory flavor. Typically, garlic is finely minced or grated to release its full aromatic intensity. The garlic flavor is strong but not overwhelming, thanks to the creamy yogurt, which softens its pungency.
In addition to garlic, fresh herbs are essential to tzatziki’s flavor profile. Dill is the most commonly used herb, providing a fragrant, slightly anise-like taste that is deeply associated with Greek cuisine. Some variations may also include mint, which adds a refreshing, slightly sweet note, or parsley for a milder, earthier flavor. The herbs bring complexity and depth to the sauce, enhancing its overall freshness and brightening up the yogurt and cucumber base.
Lemon Juice and Olive Oil: Brightening the Sauce
To add a touch of acidity and balance the richness of the yogurt, lemon juice is often incorporated into tzatziki. The lemon juice brightens the sauce, giving it a zesty kick that cuts through the creaminess and lifts the flavors. A little lemon zest can also be added for extra citrus fragrance, contributing to the sauce’s refreshing quality.
A drizzle of extra virgin olive oil is typically stirred in at the end to add richness and to enhance the Mediterranean flavors of the tzatziki. Olive oil also imparts a smooth, silky finish to the sauce, making it perfect for dipping and spreading. The oil can also be used as a garnish on top of the finished tzatziki to create a glossy sheen and to add a final touch of flavor.
How to Serve Tzatziki Sauce
Tzatziki is incredibly versatile and can be served in many different ways. As a dip, it’s perfect for pairing with pita bread, fresh vegetables like carrots, cucumbers, or bell peppers, and crispy snacks like chips or crackers. It’s also a popular side dish for grilled meats such as souvlaki, lamb, chicken, or beef, where it works to cool down the spiciness of the meat while adding a creamy contrast.
Tzatziki can also be used as a sauce for gyros, a traditional Greek dish made of roasted meat wrapped in pita bread, or as a topping for falafel. It’s a great complement to Mediterranean flatbreads, and it can even be spread on sandwiches or burgers to add a refreshing twist.
For a light, healthy meal, tzatziki can be used as a topping for roasted or grilled vegetables, turning them into a flavorful and satisfying dish. It can also be drizzled over grain bowls, roasted potatoes, or even used as a dressing for salads, adding a creamy, tangy element to any meal.
Why Tzatziki is So Popular
Tzatziki’s widespread popularity can be attributed to both its incredible flavor and its health benefits. The yogurt-based sauce is rich in protein, probiotics, and calcium, making it a nutritious addition to any meal. It’s also naturally gluten-free and can easily be made dairy-free by substituting the Greek yogurt for a plant-based yogurt, such as coconut or almond yogurt.
Beyond its health benefits, tzatziki is loved for its versatility and ability to complement a wide range of dishes. Whether served as a dip, sauce, or side, it’s a perfect balance of creamy, tangy, savory, and fresh—all in one bite. Its Mediterranean flavors are both comforting and refreshing, making tzatziki a staple in Greek cuisine and a favorite around the world.
3) Quick and Easy Greek Recipes for Busy Weeknights
Greek Pita Bread: Soft and Fluffy Bread That’s Perfect for Wraps or Dipping
Greek pita bread is a staple of Mediterranean cuisine, known for its soft, fluffy texture and slight chewiness. Unlike other types of pita, Greek pita is usually round, slightly thicker, and has a soft, pillowy interior that makes it perfect for wraps, sandwiches, or as a side for dipping. The bread is an essential part of many Greek dishes, including gyros, souvlaki, and falafel, where it serves as both a vessel for the fillings and a delicious accompaniment for the meal.
The Ingredients: Flour, Yeast, and Olive Oil
At its core, Greek pita bread is made from a simple mix of ingredients: flour, water, yeast, olive oil, salt, and sometimes a touch of sugar. The flour used in pita dough is typically all-purpose flour, though some recipes may incorporate whole wheat flour for a more rustic flavor. The use of olive oil in the dough adds richness and moisture, contributing to the soft, airy texture of the bread.
Yeast plays a critical role in the dough’s rise, ensuring that the pita puffs up during baking to create its signature pocket. The dough is kneaded to form a smooth, elastic consistency, allowing it to expand and rise properly as it rests. A small amount of sugar is sometimes added to help activate the yeast, giving the dough a gentle sweetness that balances the savory flavors.
The Pita Pocket: How It Forms
One of the distinguishing features of Greek pita bread is its « pocket. » Unlike flatbreads that remain flat throughout the baking process, Greek pita puffs up when it is baked at high heat, creating a hollow space in the center. This pocket forms as the moisture in the dough turns into steam, causing the dough to expand. Once the pita cools, the pocket can be filled with a variety of ingredients, making it perfect for wraps or sandwiches.
The key to achieving the perfect pita pocket is ensuring the dough is rolled out to an even thickness before baking, as uneven thickness can cause the bread to puff incorrectly. A dough is also baked quickly at a high temperature—usually in a hot oven or on a cast iron skillet—so that it puffs up rapidly, creating a soft, chewy interior with a lightly crisp exterior.
The Baking Process: High Heat for a Soft, Puffed Texture
Greek pita bread is traditionally baked in an extremely hot oven or on a very hot surface, such as a cast iron skillet or a tandoor, a clay oven commonly used in Mediterranean and Middle Eastern cooking. The high heat is essential for creating the classic puffed pocket, as it allows the dough to cook quickly, forming the outer crust while trapping steam inside.
In a home kitchen, the bread can be baked on a preheated pizza stone or cast iron skillet to replicate the high-heat baking environment. If using a conventional oven, it’s best to bake the pitas on the top rack, which is closest to the heat source, to achieve the ideal puffing and texture.
Once the pitas are baked, they are removed from the oven and wrapped in a clean kitchen towel to keep them warm and soft. This helps preserve their moisture and ensures that they stay pliable for wraps and dipping.
Serving Greek Pita Bread
Greek pita bread is incredibly versatile and can be used in a wide variety of ways. As a classic accompaniment to Greek meals, it is often served alongside dishes like hummus, tzatziki, and baba ganoush for dipping. The soft, chewy texture of the bread makes it perfect for sopping up sauces and dips, and its mild flavor doesn’t overpower the more complex, bold flavors of Mediterranean dips.
Pita bread is also the foundation for many Greek street food dishes. For example, gyros and souvlaki are often served wrapped in pita, with the bread acting as a container for juicy grilled meats, fresh vegetables, and tangy sauces like tzatziki. The pita’s ability to hold up to the weight of these fillings while still maintaining its soft, pliable texture makes it the ideal wrap for these dishes.
Greek pita can also be sliced into wedges and toasted to make crispy chips, which are great for snacking or serving alongside salads. Additionally, it can be used as a base for pizzas or flatbreads, topped with ingredients like tomatoes, olives, feta cheese, and herbs before being baked to perfection.
Why Greek Pita Bread is So Popular
Greek pita bread’s popularity can be attributed to both its versatility and its deliciously soft texture. Unlike other types of flatbreads, Greek pita has a unique combination of chewiness and fluffiness that makes it a joy to eat. Its neutral flavor profile allows it to complement a wide range of savory dishes, from grilled meats to dips and spreads, while also being sturdy enough to hold up to fillings and toppings.
In addition to its versatility, Greek pita bread is also relatively easy to make at home with minimal ingredients. The process is straightforward and the dough can be prepared in advance, making it a great option for meal prep or for entertaining guests. Making fresh pita bread from scratch gives it an unbeatable flavor and texture that is far superior to store-bought options.
Finally, Greek pita is also a symbol of the simplicity and quality that define Mediterranean cuisine. It’s a humble yet essential bread that brings people together around the table, whether for a casual meal with friends or a celebratory feast
Horiatiki (Greek Village Salad): A Simple, Fresh Salad with Cucumbers, Olives, Red Onions, and Feta Cheese
Horiatiki, commonly known as Greek Village Salad, is one of the most iconic and beloved dishes in Greek cuisine. As its name suggests, it originates from the rural villages of Greece, where fresh, seasonal ingredients were easily accessible and used to create simple, flavorful meals. Horiatiki is a vibrant salad that combines fresh vegetables like cucumbers, tomatoes, and red onions with Kalamata olives and creamy feta cheese. The beauty of this salad lies in its minimalism—each ingredient is carefully selected for its quality, and the flavors come together to create a refreshing, satisfying dish that is perfect for any meal.
The Key Ingredients: Fresh, High-Quality Produce
At the heart of Horiatiki is the use of fresh, high-quality ingredients that are staples of Mediterranean cuisine. The vegetables used in this salad are usually seasonal and picked at the peak of their ripeness, ensuring maximum flavor.
- Cucumbers: Crunchy and refreshing, cucumbers are an essential ingredient in Horiatiki. They provide a cooling contrast to the sharper flavors of the onions and olives, while adding a light, hydrating element to the salad. In Greek salads, cucumbers are often sliced into thick rounds or half-moons, giving the salad a satisfying crunch in every bite.
- Tomatoes: Ripe, juicy tomatoes are another key component. In Greece, tomatoes are often sweet and flavorful, especially during the summer months. They are cut into wedges or large chunks and serve as the base of the salad, creating a burst of juiciness with every mouthful. The tomatoes’ natural sweetness pairs beautifully with the briny olives and salty feta.
- Red Onions: Thinly sliced red onions provide a subtle sharpness and slight sweetness that balances the other ingredients. Their mild flavor is ideal for this salad, as they add an aromatic touch without overwhelming the freshness of the vegetables. The red onions also add a pop of color, enhancing the visual appeal of the salad.
- Kalamata Olives: Kalamata olives are a must-have in Horiatiki salad. Known for their deep purple color and rich, briny flavor, these olives are an integral part of the dish. Their salty, savory taste adds complexity and a satisfying contrast to the sweetness of the tomatoes and the creaminess of the feta.
- Feta Cheese: No Greek salad is complete without feta cheese. This crumbly, tangy cheese is typically made from sheep’s milk (or a mix of sheep and goat’s milk) and has a distinctive, slightly salty flavor. In Horiatiki, the feta is often served in large blocks or thick slices, rather than crumbled, and it is placed on top of the salad for a dramatic, rustic presentation. The creaminess of the feta ties the ingredients together and gives the salad its signature richness.
The Dressing: Simple Yet Flavorful
A dressing for Horiatiki is incredibly simple yet incredibly flavorful, reflecting the minimalist approach of Greek cuisine. Traditional Greek salad dressings typically consist of just three key ingredients: extra virgin olive oil, red wine vinegar, and dried oregano.
- Extra Virgin Olive Oil: Greek olive oil is known for its exceptional quality, with a rich, fruity taste and a slightly peppery finish. The olive oil is the base of the dressing and adds a smooth, silky richness that coats the vegetables. A generous drizzle of high-quality olive oil is essential to bring the flavors of the salad together and enhance its Mediterranean character.
- Red Wine Vinegar: Red wine vinegar provides the necessary acidity to balance the richness of the olive oil and feta cheese. It adds a tangy brightness to the salad and helps to cut through the natural sweetness of the tomatoes and cucumbers. The vinegar also helps to slightly marinate the vegetables, enhancing their flavors.
- Dried Oregano: Greek oregano is the herb of choice for seasoning Horiatiki. It has a robust, earthy flavor with hints of citrus and pine, which pairs beautifully with the fresh vegetables. A sprinkle of dried oregano gives the salad a fragrant, savory aroma and enhances the overall flavor profile without overwhelming the freshness of the ingredients.
Assembly: How to Put It All Together
As with many traditional Greek dishes, the assembly of Horiatiki is simple yet important. The vegetables are typically arranged in a rustic, casual manner on a large serving plate. Cucumbers, tomatoes, and onions are placed first, creating a colorful base. The olives are scattered over the top, and the block of feta is placed in the center. The salad is then drizzled with the dressing and sprinkled with a generous amount of dried oregano.
Unlike many salads where the ingredients are tossed together, Horiatiki is usually left undisturbed, allowing each ingredient to shine individually. The dressing is added just before serving, allowing the flavors to meld while maintaining the integrity of each component. Some versions of Horiatiki may also include a few capers or a slice of bread on the side, but the classic version remains simple and unadorned.
Serving Suggestions: The Perfect Accompaniment
Horiatiki is a versatile dish that can be served as a side or a main. As a side dish, it pairs wonderfully with grilled meats such as lamb, chicken, or pork. The freshness of the salad complements the richness of the grilled meats, providing a light and refreshing contrast. It’s also a great side dish for Mediterranean platters, such as grilled seafood, kebabs, or meze spreads.
In Greece, Horiatiki is often served alongside pita bread, allowing diners to scoop up the salad with the bread or enjoy it with a dollop of tzatziki. The salad can also be enjoyed as a light lunch or dinner on its own, especially during the warmer months when the ingredients are at their freshest.
Why Horiatiki is So Popular
Horiatiki’s popularity is due to its simplicity, freshness, and the quality of its ingredients. The salad reflects the essence of Greek cuisine—using minimal yet high-quality ingredients to create a dish that is full of flavor and texture. It’s also incredibly nutritious, packed with fresh vegetables, healthy fats from olive oil, and protein from the feta cheese.
Moreover, Horiatiki embodies the Mediterranean lifestyle—simple, healthy, and full of flavor. It’s a dish that can be enjoyed year-round, whether as part of a festive meal or as a quick and easy dish on a hot summer day. Its universal appeal and versatility have made it a favorite not only in Greece but around the world.
Greek-Style Chicken: Marinated Chicken with Mediterranean Herbs, Quick to Cook, and Packed with Flavor
Greek-Style Chicken is a flavorful, easy-to-make dish that brings the vibrant tastes of the Mediterranean to your table. Marinated in a mixture of fresh herbs, olive oil, garlic, lemon, and spices, the chicken becomes incredibly tender and infused with bold, aromatic flavors. This dish is a fantastic example of how Greek cuisine emphasizes simple ingredients, but results in mouthwatering meals that are both healthy and delicious.
The Marinade: Fresh Herbs and Zesty Ingredients
A key to Greek-Style Chicken is the marinade. The combination of Mediterranean herbs and bright, zesty ingredients creates a harmonious flavor profile that permeates the chicken. Here’s a breakdown of the components of the marinade:
- Olive Oil: Extra virgin olive oil is a cornerstone of Greek cooking. It adds richness to the chicken while allowing the other ingredients to meld together. The olive oil helps keep the chicken moist during cooking and provides a lush, velvety texture to the dish.
- Lemon Juice and Zest: Lemon is one of the most iconic ingredients in Greek cuisine, lending a fresh, tangy kick to the chicken. The acidity from the lemon juice helps tenderize the meat, while the zest adds an extra layer of citrusy fragrance. Together, the lemon creates a bright contrast to the richness of the olive oil.
- Garlic: Fresh garlic is a must-have in Greek-Style Chicken. Its robust, savory flavor infuses the marinade and complements the other ingredients perfectly. Garlic is often used generously in Greek cooking, and its pungency adds depth to the chicken’s flavor.
- Greek Oregano: Oregano is a quintessential herb in Greek cooking, offering a slightly bitter, earthy flavor with hints of citrus. Greek oregano is particularly fragrant and aromatic, giving the chicken its distinct Mediterranean flair. Oregano pairs wonderfully with lemon and garlic, making it the perfect seasoning for Greek-Style Chicken.
- Thyme and Rosemary: While oregano is the star of the marinade, adding a touch of thyme and rosemary brings a depth of flavor that makes the chicken more aromatic and complex. These herbs, which grow abundantly in Greece, add woody, earthy notes that balance the bright citrus and pungent garlic.
- Salt and Pepper: Simple seasonings like salt and freshly ground black pepper bring out the natural flavors of the chicken and enhance the effectiveness of the marinade.
Marinating the Chicken: The Key to Tenderness and Flavor
For Greek-Style Chicken, the marinating process is crucial. Allowing the chicken to soak in the herbaceous marinade for at least 30 minutes—preferably a few hours or overnight—gives the meat time to absorb the flavors, resulting in a tender, juicy chicken that’s bursting with Mediterranean taste.
When marinating, it’s important to ensure the chicken is fully coated with the marinade. Using a large, resealable plastic bag or a shallow dish is ideal for evenly distributing the flavors. You can marinate whole chicken breasts, thighs, or even drumsticks. The longer the chicken marinates, the more flavorful it becomes, but even a short marinating time will yield excellent results.
Cooking Methods: Quick and Versatile
Greek-Style Chicken is incredibly versatile and can be cooked in a variety of ways depending on your preference and available equipment. Some popular cooking methods include:
- Grilling: Grilling the marinated chicken on a barbecue or stovetop grill pan is one of the best ways to cook Greek-Style Chicken. The high heat of the grill sears the chicken, creating deliciously crispy, caramelized edges while locking in the moisture and flavor. The smoky char from the grill complements the herbaceous marinade, making each bite even more flavorful. Grill for about 5–7 minutes per side, depending on the thickness of the chicken, until it reaches an internal temperature of 165°F (75°C).
- Pan-Seared: For a quicker, stovetop option, pan-searing the chicken is a great choice. Heat some olive oil in a skillet over medium-high heat and cook the marinated chicken for about 6–8 minutes per side, or until the internal temperature reaches 165°F (75°C). This method creates a nice golden crust on the chicken while keeping it juicy inside.
- Oven-Roasting: If you prefer to cook the chicken in the oven, roasting is an excellent option. Preheat your oven to 375°F (190°C) and roast the marinated chicken on a baking sheet for about 20–30 minutes, depending on the cut. Oven-roasting helps the chicken cook evenly while preserving its moisture. You can also broil the chicken for the last 5 minutes to add extra color and crispness to the skin.
- Skewering (Souvlaki Style): For a fun twist, you can thread marinated pieces of chicken onto skewers and grill or bake them in the style of souvlaki. This method makes for a perfect addition to a Mediterranean platter, where you can serve the chicken skewers with pita, tzatziki, and fresh vegetables.
Serving Suggestions: A Complete Mediterranean Meal
Greek-Style Chicken can be served in a variety of ways, depending on the occasion and your personal preferences. Here are a few serving suggestions that complement the flavors of the chicken:
- With Greek Salad: A classic pairing for Greek-Style Chicken is a side of fresh, vibrant Greek salad. The crisp vegetables, briny olives, and creamy feta cheese in the salad provide a refreshing contrast to the savory chicken, making it a complete Mediterranean meal.
- With Tzatziki Sauce: Tzatziki, the beloved Greek yogurt-based sauce with cucumber, garlic, and dill, is a fantastic accompaniment to Greek-Style Chicken. The cool and creamy sauce perfectly balances the zesty flavors of the chicken and adds an extra layer of flavor.
- With Pita Bread: Serve the chicken with warm pita bread for a satisfying wrap. You can slice the chicken and place it inside the pita along with vegetables, tzatziki, and a sprinkle of feta for a delicious gyro-inspired meal.
- With Rice or Roasted Vegetables: For a heartier option, Greek-Style Chicken pairs beautifully with a side of lemon-infused rice or roasted Mediterranean vegetables like zucchini, bell peppers, and eggplant. The side dishes soak up the chicken’s delicious marinade and round out the meal.
Why Greek-Style Chicken is So Popular
Greek-Style Chicken’s popularity can be attributed to its simplicity, versatility, and the bold, fresh flavors of the Mediterranean. It’s an incredibly easy dish to prepare, making it perfect for weeknight dinners or meal prepping for the week. The marinade infuses the chicken with deep flavors, while the cooking methods ensure that the chicken stays juicy and tender. Moreover, the ability to customize the dish with various sides makes it a great option for different tastes and dietary preferences.
The healthy ingredients—such as olive oil, lean chicken, and fresh herbs—make this dish not only delicious but nutritious as well. It’s a lighter option compared to many traditional comfort foods but still rich in flavor, making it a satisfying and wholesome meal.
Greek-Style Chicken embodies the essence of Mediterranean cuisine, where fresh, vibrant ingredients are the stars of the dish. It’s a meal that brings people together, whether for a casual weeknight dinner or a festive Mediterranean feast.

4) Sweet Greek Treats You Can Make at Home
Baklava: A Rich and Sweet Pastry Made of Filo Dough, Walnuts, and Honey Syrup
Baklava is one of the most iconic and beloved desserts in Greek cuisine, known for its rich, indulgent layers of filo dough, crunchy nuts, and sticky honey syrup. It’s a sweet pastry that has earned its reputation not only in Greece but throughout the entire Mediterranean and beyond, thanks to its irresistible combination of textures and flavors. Whether served at special occasions or as a sweet treat after a hearty meal, Baklava never fails to impress.
The Ingredients: Layers of Flavor and Texture
Baklava is a dessert that relies on a few simple, high-quality ingredients. Each of these ingredients contributes to the pastry’s delicate texture and intense sweetness, creating a perfect balance between crunch and gooey, honeyed richness.
Filo Dough: The foundation of Baklava is its thin, delicate layers of filo dough. Filo (or phyllo) dough is a very thin, paper-like pastry dough that’s typically used in Mediterranean and Middle Eastern desserts. When baked, it turns golden and crispy, creating a light, flaky texture that contrasts beautifully with the rich filling and syrup. The many layers of filo are brushed with melted butter or ghee, which ensures that the pastry crisps up perfectly and creates a slight richness in flavor.
Nuts: Walnuts are the most common nut used in Greek Baklava, though other variations may feature pistachios, almonds, or a combination of nuts. The walnuts provide a wonderful crunch and a slightly earthy flavor that balances the sweetness of the honey syrup. The nuts are often coarsely chopped or ground, allowing them to distribute evenly throughout the layers of filo and creating a satisfying bite in each piece.
Butter: Baklava is traditionally made with plenty of melted butter, which is brushed between each layer of filo dough. The butter contributes to the richness of the pastry and helps the layers bake to a crisp, golden perfection. In some variations, clarified butter (ghee) may be used to give the pastry an even richer flavor.
Sugar and Cinnamon: The nut mixture is typically combined with sugar and ground cinnamon, which add sweetness and warmth to the filling. The cinnamon gives the Baklava a familiar, comforting flavor, while the sugar intensifies the sweetness. In some variations, cloves or cardamom may also be added to enhance the aromatic profile of the dessert.
The Honey Syrup: The Sweet and Sticky Finish
What truly sets Baklava apart from other pastries is the sweet, sticky syrup that is poured over the hot dessert after baking. The syrup is the crowning touch that makes Baklava so decadently sweet and gives it its signature stickiness.
- Honey: Honey is the key ingredient in the syrup, providing a rich sweetness and a slightly floral, earthy flavor. Greek honey, often made from wildflowers or thyme, is known for its unique taste and high quality, and it lends the syrup a natural sweetness that pairs beautifully with the flaky filo dough. Honey is also a traditional symbol of Greek culture, representing abundance and sweetness.
- Sugar: Sugar is also used in the syrup to enhance the sweetness and create a thick, sticky consistency. The syrup is simmered until it thickens and is then poured over the hot Baklava, allowing it to soak into the layers and create a deliciously gooey texture.
- Lemon Juice and Cinnamon Stick: A bit of lemon juice is often added to the syrup to cut through the sweetness and add a subtle tang that balances the overall flavor. The cinnamon stick infuses the syrup with a warm, spicy note that complements the cinnamon in the nut filling. Some variations may also include a splash of rose water or orange blossom water for an added layer of fragrance.
Assembling the Baklava: Layering Perfection
The process of making Baklava involves carefully layering the filo dough with butter, nuts, and spices to create the dessert’s signature flaky, layered structure. Here’s how the pastry is typically assembled:
- Prepare the Filo Layers: Start by brushing a baking dish with melted butter. Place the first layer of filo dough in the dish and brush it generously with butter. Repeat this process, layering multiple sheets of filo dough, making sure each sheet is evenly buttered. The more layers you use, the crispier and flakier the final Baklava will be. Typically, Baklava is made with around 20-30 layers of filo dough.
- Add the Nut Filling: After several layers of filo, spread an even layer of the nut mixture (walnuts, sugar, cinnamon) over the dough. This nut layer provides a rich, crunchy contrast to the delicate, buttery filo layers. Repeat the process of layering filo and nuts, alternating until the dish is filled, leaving some filo dough for the top layers.
- Top Layers of Filo: Once the nut mixture is used up, cover the Baklava with more layers of filo, brushing each sheet with butter. The top layer should be well-buttered to create a crisp, golden top when baked.
- Cut the Baklava: Before baking, it’s important to cut the Baklava into diamond or square-shaped pieces. This allows the syrup to penetrate the layers more evenly, and it also makes the Baklava easier to serve once baked. Be sure to cut through all of the layers of filo, as this will help the syrup soak in properly.
- Baking: The Baklava is then baked in a preheated oven at around 350°F (175°C) for 45-50 minutes, or until the filo is golden brown and crisp. The baking time may vary depending on the thickness of the layers and the size of the pan.
Adding the Syrup: The Sweet Soak
Once the Baklava has finished baking, remove it from the oven and immediately pour the prepared honey syrup over the hot pastry. The syrup will bubble and sizzle as it soaks into the layers of filo and nuts. It’s important to let the Baklava rest for a few hours (or overnight) to allow the syrup to fully absorb and the flavors to meld together.
Serving and Enjoying Baklava
Baklava is typically served in small pieces, as it is rich and sweet. A little goes a long way with this decadent dessert. It’s perfect for serving at celebrations, special occasions, or as a sweet ending to a Mediterranean meal. Baklava can be enjoyed with a cup of strong Greek coffee or a glass of dessert wine, such as Muscat or Retsina, which complement its sweetness and depth of flavor.
Why Baklava is So Popular
Baklava has a long history in Greece, dating back to ancient times, though it has roots in many Middle Eastern and Mediterranean cultures. The combination of filo dough, nuts, and honey has made it a cherished dessert in many countries, with each region adding its own variations. Its rich, indulgent taste and the careful layering of ingredients make it a special treat that is often associated with celebrations, holidays, and feasts.
What makes Baklava so beloved is its contrast of textures—the crispness of the filo dough, the crunch of the nuts, and the gooey, sticky sweetness of the honey syrup. Each bite is a harmonious blend of flavors and textures that’s hard to resist. Furthermore, Baklava is a versatile dessert, as it can be made in advance and stored for several days, making it an ideal choice for entertaining.
Loukoumades: Greek Honey Doughnuts, Crispy on the Outside and Soft on the Inside, Drizzled with Honey
Loukoumades are a beloved Greek dessert that brings together the irresistible combination of light, fluffy doughnuts and a sweet, sticky honey syrup. These golden, bite-sized treats are crispy on the outside, soft and airy on the inside, and finished with a drizzle of honey and a sprinkle of cinnamon. They are a popular street food in Greece, often served at festivals, celebrations, and family gatherings, and are the perfect sweet indulgence for any occasion.
The Dough: A Soft and Fluffy Base
This is foundation of Loukoumades lies in the dough, which is made from simple ingredients but requires a bit of care to get the perfect texture. The dough should be soft, light, and slightly sticky, allowing the doughnuts to puff up beautifully when fried.
Flour: The primary ingredient in Loukoumades dough is all-purpose flour. The flour provides structure to the dough while maintaining a soft and tender texture after frying. It’s essential to use the right amount of flour to create a dough that’s easy to work with but still retains enough moisture to stay light and fluffy.
Yeast: The dough is leavened with yeast, which causes the dough to rise and become airy. The yeast fermentation is a key step, as it helps the doughnuts achieve their signature light and fluffy texture. It’s important to let the dough rise until it has doubled in size, which typically takes about an hour. The yeast also imparts a subtle flavor to the dough, giving Loukoumades their authentic taste.
Sugar and Salt: A small amount of sugar is added to the dough to enhance the flavor and help with the yeast activation. A pinch of salt balances the sweetness and brings out the other flavors in the dough. Both of these ingredients work together to create a well-rounded taste.
Water and Olive Oil: The dough is mixed with warm water, which helps activate the yeast. Olive oil is also added to the dough, contributing to the richness and flavor while keeping the dough tender. Additionally, olive oil helps the doughnuts achieve a golden, crispy exterior when fried.
Optional Flavorings: While the traditional Loukoumades dough is quite simple, you can add a touch of vanilla or a splash of ouzo (anise-flavored Greek liquor) for a unique flavor. However, the dough itself is usually kept neutral to let the honey syrup shine through.
Frying: Golden Crisp Perfection
The secret to perfect Loukoumades is the frying process. The dough is scooped into small, bite-sized portions and fried in hot oil. As the doughnuts fry, they puff up into delicate, golden spheres with a crispy exterior and soft, airy interior.
- Hot Oil: The oil should be heated to about 350°F (175°C) to ensure that the doughnuts cook evenly and become crispy on the outside while staying soft and fluffy on the inside. It’s important to fry the doughnuts in small batches to prevent overcrowding the pan, which could lower the oil temperature and affect the crispiness.
- Shaping the Dough: Loukoumades dough is typically scooped into small balls using a spoon or a special doughnut scoop, which makes them uniform in size. The dough should be dropped gently into the hot oil, where it will expand as it fries. Some variations use a piping bag to form small doughnut-like shapes, but the traditional version is often round and irregular.
- Frying Time: The doughnuts take about 3–4 minutes to cook, turning golden brown and crispy. You’ll want to keep an eye on them and turn them occasionally to ensure that they cook evenly. Once they’re golden and crisp, remove them from the oil and drain them on paper towels to remove excess oil.
The Honey Syrup: The Sweet and Sticky Coating
The signature element of Loukoumades is the sweet, sticky honey syrup that’s poured over the fried doughnuts. This syrup is what gives Loukoumades their luxurious sweetness and flavor, making them irresistible.
- Honey: The star ingredient in the syrup is, of course, honey. Greek honey, especially thyme or wildflower honey, is often used, as it has a rich, floral flavor that adds depth to the syrup. The honey is heated until it becomes liquid and pourable, making it easier to soak into the fried doughnuts. The syrup should be sweet but not overpowering, allowing the delicate flavors of the dough and the crispy texture to shine through.
- Sugar and Water: The syrup is typically made by combining honey with a bit of sugar and water. The sugar helps thicken the syrup and creates a luscious, glossy finish when poured over the doughnuts. It also enhances the sweetness of the honey. The syrup is simmered for a few minutes until it reaches the desired consistency, which should be slightly thick but not too sticky.
- Lemon or Cinnamon: Some variations of Loukoumades syrup include a splash of lemon juice for a hint of acidity that cuts through the sweetness of the honey. Alternatively, cinnamon can be added to the syrup or sprinkled on top of the finished Loukoumades, giving them an aromatic warmth that enhances the flavor profile.
Assembling Loukoumades: The Final Touch
Once the Loukoumades are fried and golden, they are drenched in the warm honey syrup, which soaks into the doughnuts, making them sweet and sticky. The syrup should be poured while the doughnuts are still hot to allow for maximum absorption. The finished Loukoumades are typically served hot or at room temperature, making them an irresistible treat.
Serving Loukoumades: Perfect for Any Occasion
Loukoumades are typically served as a dessert or snack and are perfect for sharing. They’re often enjoyed at street food stalls, festivals, and family gatherings, but they can also be served as a special treat at home.
- With Extra Honey and Cinnamon: While the honey syrup is the main topping, Loukoumades are often garnished with an extra drizzle of honey and a dusting of cinnamon. The cinnamon adds warmth and depth, making each bite more fragrant and flavorful.
- With Chopped Nuts: For added texture and flavor, some versions of Loukoumades are topped with crushed walnuts, pistachios, or almonds. The crunch of the nuts contrasts beautifully with the soft, sticky doughnuts.
- With Powdered Sugar: Some people prefer to sprinkle a bit of powdered sugar on top of their Loukoumades for a touch of extra sweetness, though the honey syrup usually provides more than enough sweetness on its own.
Why Loukoumades are So Popular
Loukoumades have a long history in Greek culture, dating back to ancient times. Originally known as « honey tokens, » they were served to Olympic athletes during the ancient Greek Games as a symbol of victory. Today, Loukoumades remain a popular street food and festive treat, loved by locals and tourists alike for their delightful combination of textures and flavors.
Their popularity can be attributed to their simplicity, versatility, and the comforting satisfaction they provide. Loukoumades are perfect for any occasion—whether you’re hosting a dinner party, attending a festival, or enjoying a sweet treat at home. The combination of crispy fried dough and rich honey syrup is a universal crowd-pleaser, making Loukoumades a true staple of Greek dessert culture
Galaktoboureko: A Delicious Custard-Filled Pastry with a Sweet Syrup, Baked Until Golden and Crispy
Galaktoboureko is a classic Greek dessert that showcases the perfect balance of rich, creamy custard and crispy, flaky filo pastry, all drenched in a sweet, aromatic syrup. The dessert is a true indulgence and a celebration of Greek pastry-making at its finest. With its layers of delicate filo, velvety custard filling, and the sweet finishing touch of syrup, Galaktoboureko has earned a special place in Greek culinary traditions.
The Custard Filling: A Silky, Creamy Delight
Heart of Galaktoboureko is its custard filling, made from simple yet rich ingredients that combine to create a smooth, creamy texture. The custard is the soul of the dessert, providing the perfect contrast to the crispy filo layers. Here’s how the custard comes together:
Semolina: Semolina is the key ingredient in the custard filling of Galaktoboureko. It’s a type of durum wheat that has been ground into coarse flour. Semolina thickens the custard, giving it a dense yet silky texture. It also imparts a subtle graininess that adds depth to the custard while ensuring it holds together well inside the pastry.
Milk and Sugar: Milk is used as the base for the custard, providing a creamy and smooth texture. Whole milk is typically preferred, as it adds richness and helps create a custard that is thick yet soft. Sugar is added to sweeten the custard, balancing the richness of the milk and semolina with just the right amount of sweetness.
Eggs: Eggs are added to the custard to help it set, giving it a firm but smooth texture. They also contribute to the richness and creaminess of the filling. The eggs are usually beaten into the milk and semolina mixture before it’s cooked, creating a custard that’s velvety and custardy in texture.
Vanilla and Lemon Zest: To flavor the custard, a hint of vanilla is added for its warm, sweet aroma. Additionally, lemon zest is often incorporated into the custard filling, giving it a fresh, citrusy brightness that balances the sweetness and adds a refreshing contrast to the rich custard.
The Filo Pastry: Thin, Flaky, and Buttery
Filo dough is the foundation of Galaktoboureko’s structure, providing the pastry’s signature crispiness and delicate texture. The dough itself is thin, translucent, and delicate, creating layers of crunchiness once baked.
- Filo Dough: Filo dough is used in layers, brushed with butter or olive oil to ensure the pastry crisps up perfectly when baked. The dough is stretched thin to create the characteristic, light texture that makes Galaktoboureko so irresistible. Typically, multiple layers of filo are used, with each layer adding to the flakiness of the final pastry.
- Butter or Olive Oil: A generous amount of melted butter is brushed between each layer of filo dough to ensure that the pastry bakes to a golden, crispy finish. The butter adds richness and a savory flavor that complements the sweet custard filling. In some variations, olive oil can be used for a slightly lighter result, but butter is the traditional choice for its flavor.
Assembling the Galaktoboureko: Layering for Perfection
The process of making Galaktoboureko requires careful attention to detail, especially when layering the filo dough and custard. Here’s how the dessert is assembled:
- Preparing the Filo Layers: Start by brushing a baking dish with melted butter or oil. Lay the first few sheets of filo dough in the dish, brushing each sheet generously with butter. The layers should be slightly overlapping, and you should use about 8-10 sheets for the bottom layer. Each sheet should be brushed with butter to ensure it becomes crisp and flaky.
- Adding the Custard Filling: Once the filo layers are in place, the creamy custard filling is poured over the filo base. The custard should be evenly spread across the filo dough, forming a smooth layer. Be careful not to overfill, as the custard should be just enough to create a thick, creamy center without spilling over.
- Layering the Top: Once the custard is in place, the top of the Galaktoboureko is sealed with additional layers of filo dough. The same technique is used—laying the filo sheets over the custard and brushing them with butter to create a golden, crisp finish. The top should be evenly layered with filo dough, and the ends should be tucked in around the edges to ensure the custard stays sealed inside.
- Cutting the Galaktoboureko: Before baking, it’s common to score the top layer of filo dough into squares or diamond shapes. This ensures that the syrup can be absorbed evenly later, and it also makes it easier to cut and serve once baked.
Baking: Golden and Crispy Perfection
Once assembled, the Galaktoboureko is baked in a preheated oven at around 350°F (175°C) for 45-50 minutes, or until the filo dough is golden brown and crispy. During baking, the custard will set into a smooth, firm filling, while the layers of filo become crispy and flaky.
- Golden Finish: The Galaktoboureko is done when the top layer of filo is golden brown and crisp. The contrast between the golden, flaky filo and the creamy, custard center is one of the signature features of this dessert.
The Sweet Syrup: The Final Touch of Sweetness
After baking, Galaktoboureko is drenched with a fragrant syrup that enhances its sweetness and adds moisture to the pastry. The syrup soaks into the filo layers, making them even more crispy and sticky while balancing the richness of the custard filling.
- Sugar and Water: The syrup is typically made with sugar, water, and a hint of lemon juice, which helps cut through the sweetness and adds a subtle tang. The syrup is simmered until it thickens, creating a glossy, sticky consistency that coats the pastry.
- Vanilla and Lemon: To flavor the syrup, a bit of lemon juice and vanilla extract are often added. The lemon adds a refreshing acidity that contrasts beautifully with the sweet custard and the syrup’s sugar. The vanilla adds a touch of warmth, tying the flavors together and enhancing the dessert’s aromatic qualities.
- Soaking the Pastry: Once the Galaktoboureko is removed from the oven, the hot syrup is poured over the crispy pastry. The syrup should be poured slowly to ensure that the filo dough absorbs it evenly. The syrup not only adds sweetness but also helps soften the filo, giving it a luscious, sticky texture that contrasts with the crispy exterior.
Serving and Enjoying Galaktoboureko
Galaktoboureko is traditionally served as a dessert at family gatherings, festivals, and special occasions. The crispy, syrup-soaked filo combined with the smooth, creamy custard makes for a rich, indulgent treat that’s perfect for sharing.
- Serving Tips: Once the syrup has been absorbed and the Galaktoboureko has cooled to room temperature, it can be sliced into squares or diamonds, making it easy to serve. It’s best enjoyed on its own or accompanied by a small cup of strong Greek coffee to balance the sweetness.
- Variations: While the classic Galaktoboureko is made with semolina-based custard, some variations might incorporate flavored syrups such as orange blossom or rosewater, which add a floral touch to the dessert. Other variations may use a lighter, egg-based custard filling instead of semolina.
Why Galaktoboureko is So Special
Galaktoboureko is a beloved dessert in Greece, often prepared during holidays and celebrations. Its layers of delicate filo, combined with the rich custard and sweet syrup, make it a treat that’s loved by people of all ages. The dessert is not only delicious but also represents the artistry of Greek pastry-making—combining simple, traditional ingredients in a way that elevates them into something truly spectacular.
Galaktoboureko’s rich flavor and texture, along with its delicate balance of sweetness and richness, make it a timeless favorite in Greek kitchens. Its satisfying combination of crispy filo, smooth custard, and fragrant syrup is what makes it an unforgettable dessert for any occasion.
Conclusion
A Delicious Journey Through Greek Cuisine
Throughout this post, we’ve explored a delightful array of 10 classic Greek dishes, each offering a unique taste of Greek culture and culinary tradition. From the comforting layers of Moussaka and the savory goodness of Souvlaki to the crispy, sweet indulgence of Baklava and Loukoumades, Greek cuisine has something to offer every palate. Whether you’re craving a fresh and tangy Greek Salad or a hearty, soul-warming dish like Galaktoboureko, these recipes capture the essence of the Mediterranean and its rich flavors.
A Taste of Greece at Home
These Greek recipes are not only delicious but also easy to recreate in your own kitchen. By following simple instructions and using fresh ingredients, you can bring a taste of Greece into your home. The beauty of Greek cuisine lies in its versatility—whether you’re preparing a light appetizer like Tzatziki Sauce to dip into with Greek Pita Bread, or crafting a flavorful dinner with Grilled Fish with Lemon and Herbs, you’ll discover that cooking Greek food can be a fun, rewarding, and satisfying experience.
Why You Should Try Greek Recipes
Greek food is known for its focus on fresh, high-quality ingredients, which makes it both healthy and flavorful. Packed with vegetables, lean meats, seafood, and healthy fats like olive oil, Greek dishes offer a wonderful balance of taste and nutrition. Many Greek recipes are also naturally rich in Mediterranean ingredients, known for their health benefits such as promoting heart health and reducing inflammation.
Whether you’re serving these dishes for a casual weeknight dinner, a festive celebration, or a cozy family gathering, Greek food provides the perfect option for any occasion. It’s satisfying without being heavy, bursting with flavors that are sure to please everyone around the table.
Encouraging You to Experiment
I encourage you to try making these Greek recipes at home and experiment with new flavors. The beauty of Greek cuisine is that it invites creativity—feel free to adjust the seasoning or ingredients based on what you have available. As you cook, don’t be afraid to make the recipes your own. Remember, Greek cooking is all about celebrating fresh ingredients and bringing them together in a way that honors tradition while allowing room for innovation.
A Healthful and Flavorful Meal for Every Occasion
In addition to the wonderful taste, Greek food offers a healthy, balanced approach to eating. Many of these recipes are packed with antioxidants, healthy fats, and protein, making them a great choice for those looking to enjoy satisfying meals without compromising their health. Whether you’re trying a rich and creamy Galaktoboureko for dessert or grilling up Souvlaki for a family barbecue, Greek dishes are sure to add joy to your dining experience.
Greek food has a timeless appeal that transcends cultures and borders. So, gather your ingredients, roll up your sleeves, and enjoy the process of creating these delicious dishes in your own kitchen. Whether you’re a seasoned chef or a beginner in the kitchen, these recipes will bring you a taste of Greece that’s sure to impress.